

News
- 2026/05/21: We now recommend Qwen3.6-35B-A3B as the first local model to try with OpenHands. It is an open-weight MoE model built for agentic coding, supports a large context window, and is available through LM Studio, Ollama, vLLM, and SGLang.
Quickstart: Running OpenHands with a Local LLM using LM Studio
This guide explains how to serve a local LLM using LM Studio and have OpenHands connect to it. We recommend:- LM Studio as the local model server, which handles metadata downloads automatically and offers a simple, user-friendly interface for configuration.
- Qwen3.6-35B-A3B as the LLM for software development. This model is optimized for agentic coding and works well with tool-heavy workflows like OpenHands.
Hardware Requirements
Running Qwen3.6-35B-A3B requires:- A recent GPU with at least 24GB of VRAM for quantized variants, or multiple GPUs for full precision and larger context windows, or
- A Mac with Apple Silicon with at least 64GB of unified memory for quantized variants
1. Install LM Studio
Download and install the LM Studio desktop app from lmstudio.ai.2. Download the Model
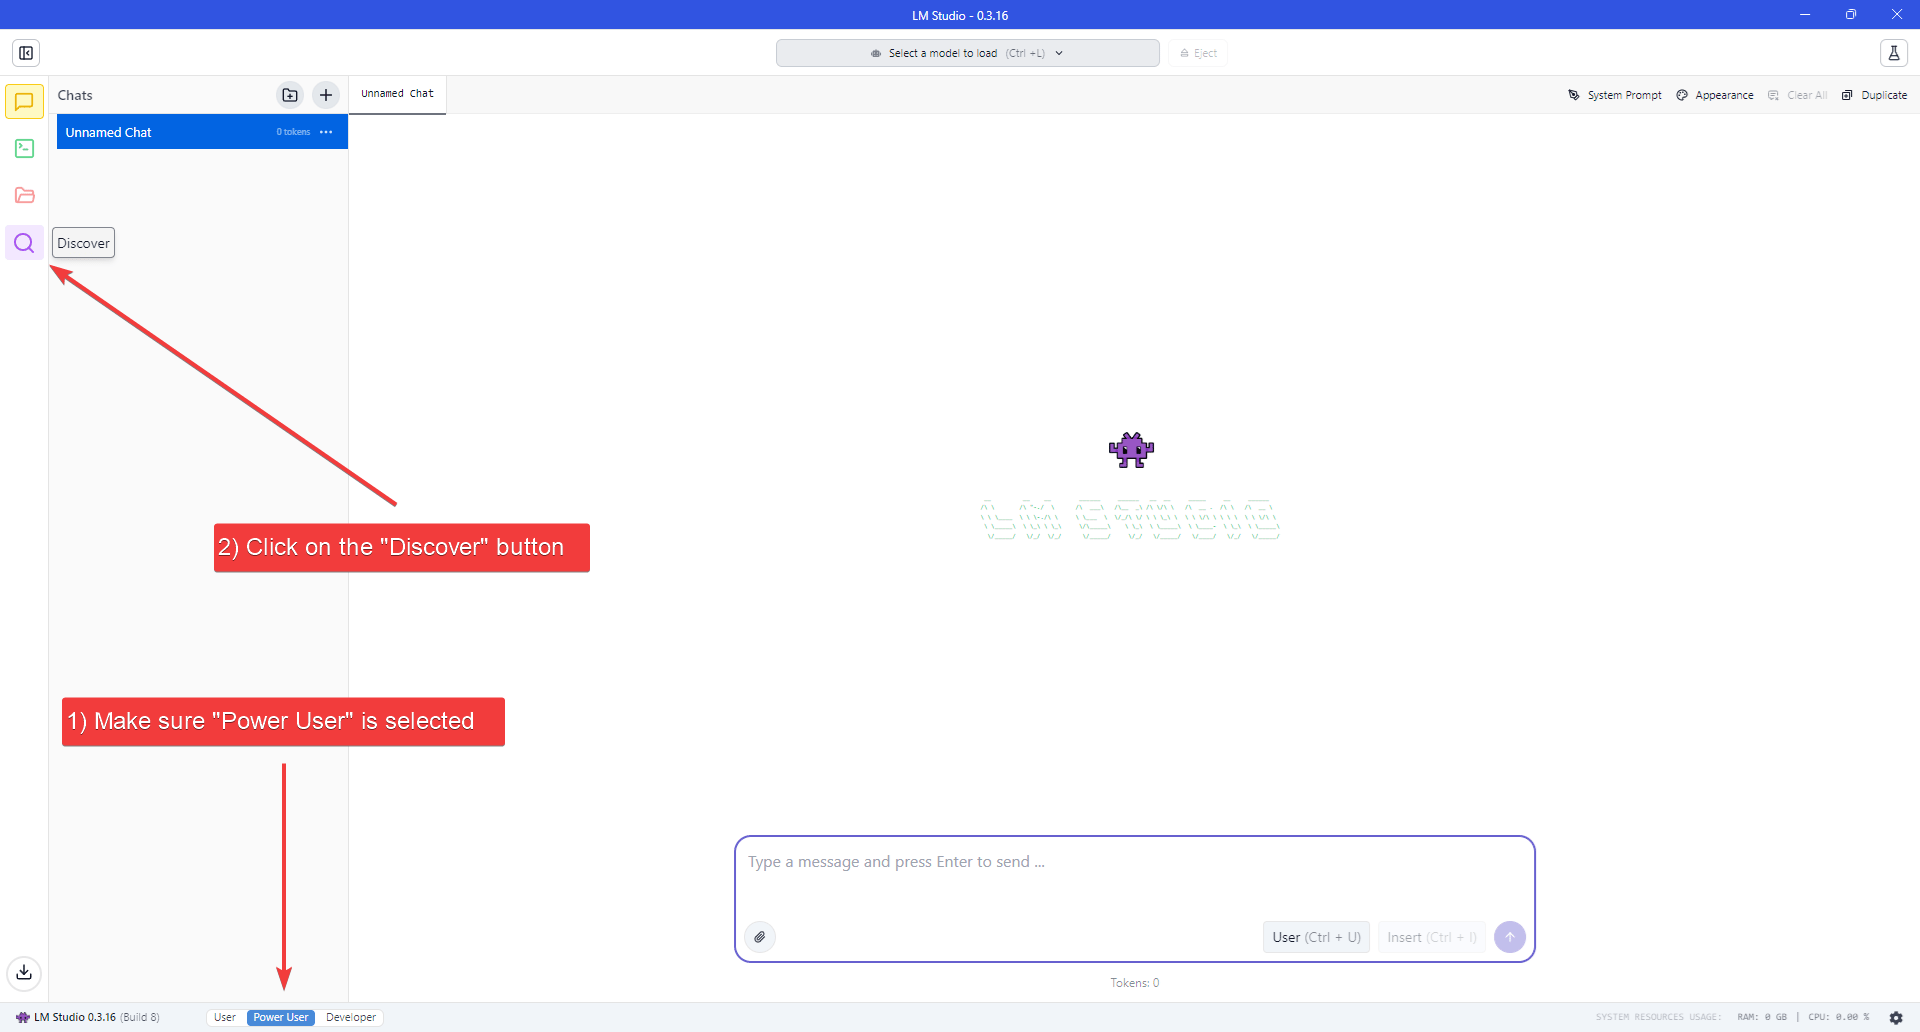
- Make sure to set the User Interface Complexity Level to “Power User”, by clicking on the appropriate label at the bottom of the window.
- Click the “Discover” button (Magnifying Glass icon) on the left navigation bar to open the Models download page.
- Search for “Qwen3.6-35B-A3B”, confirm you’re downloading from the official Qwen publisher, then proceed to download.
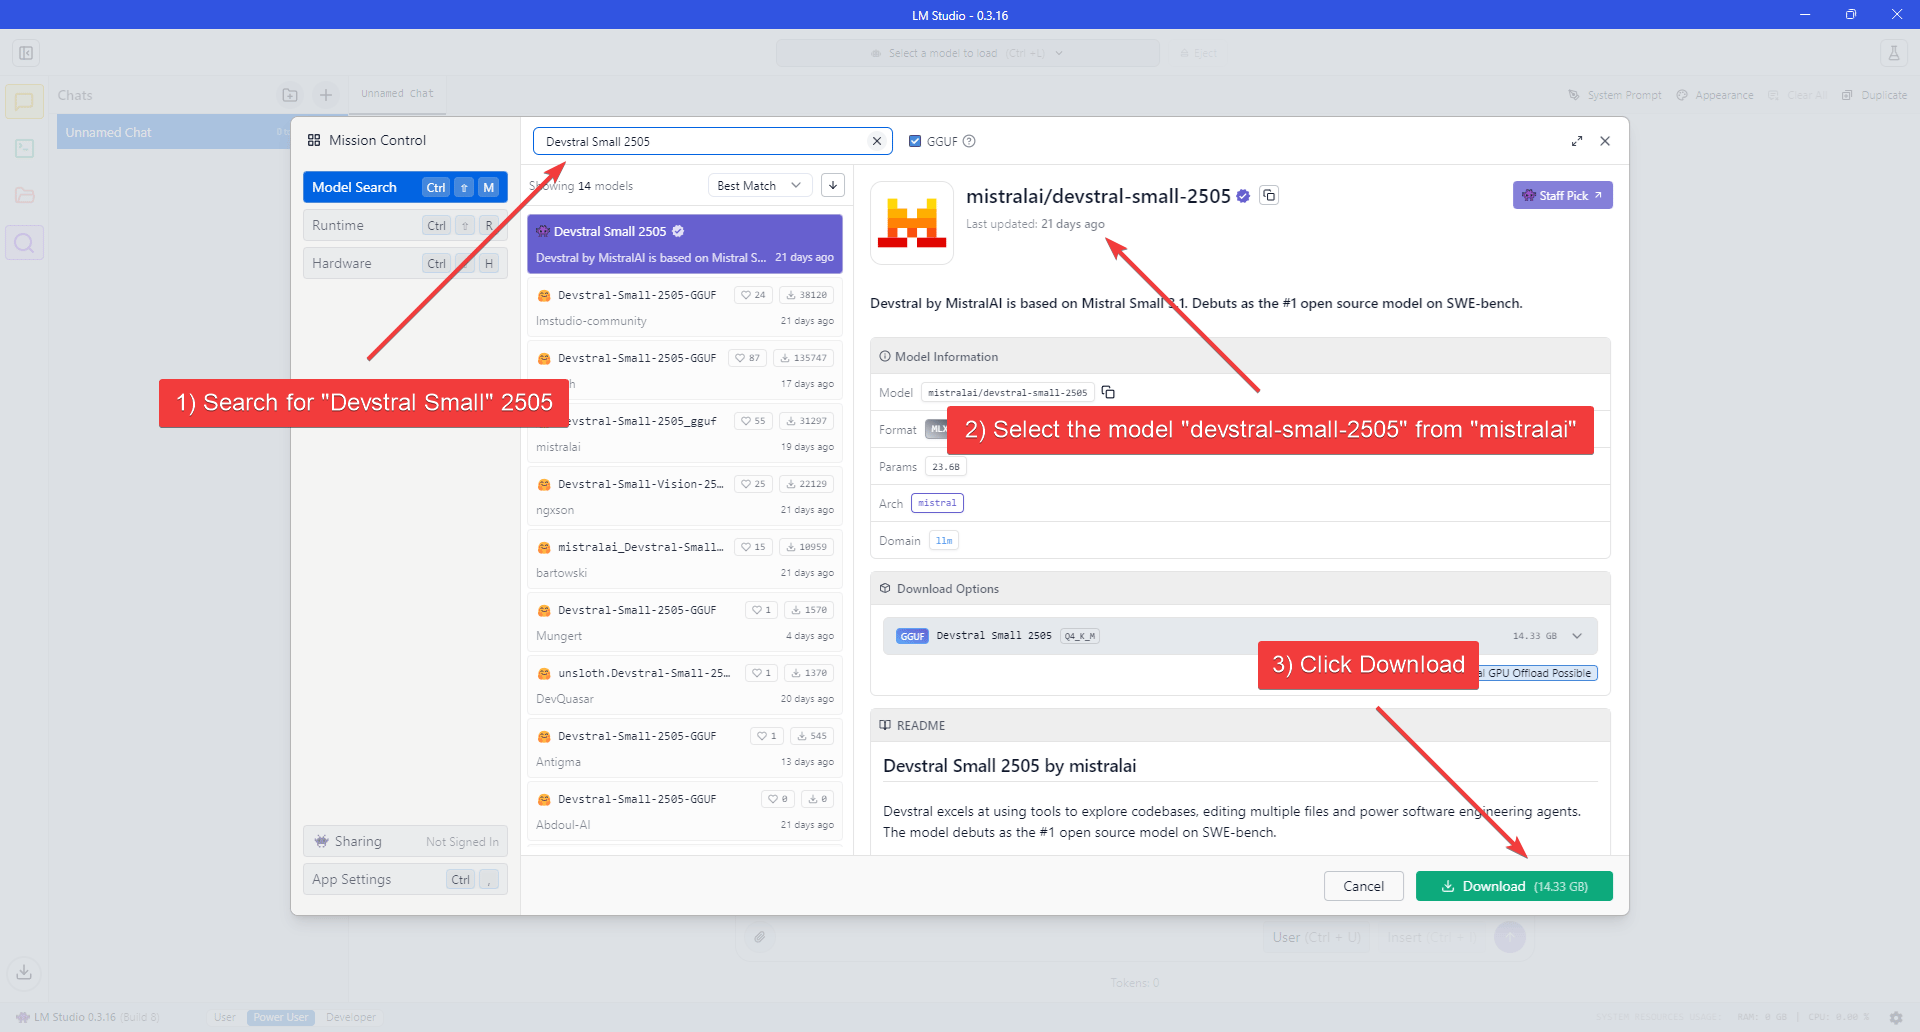
- Wait for the download to finish.
3. Load the Model
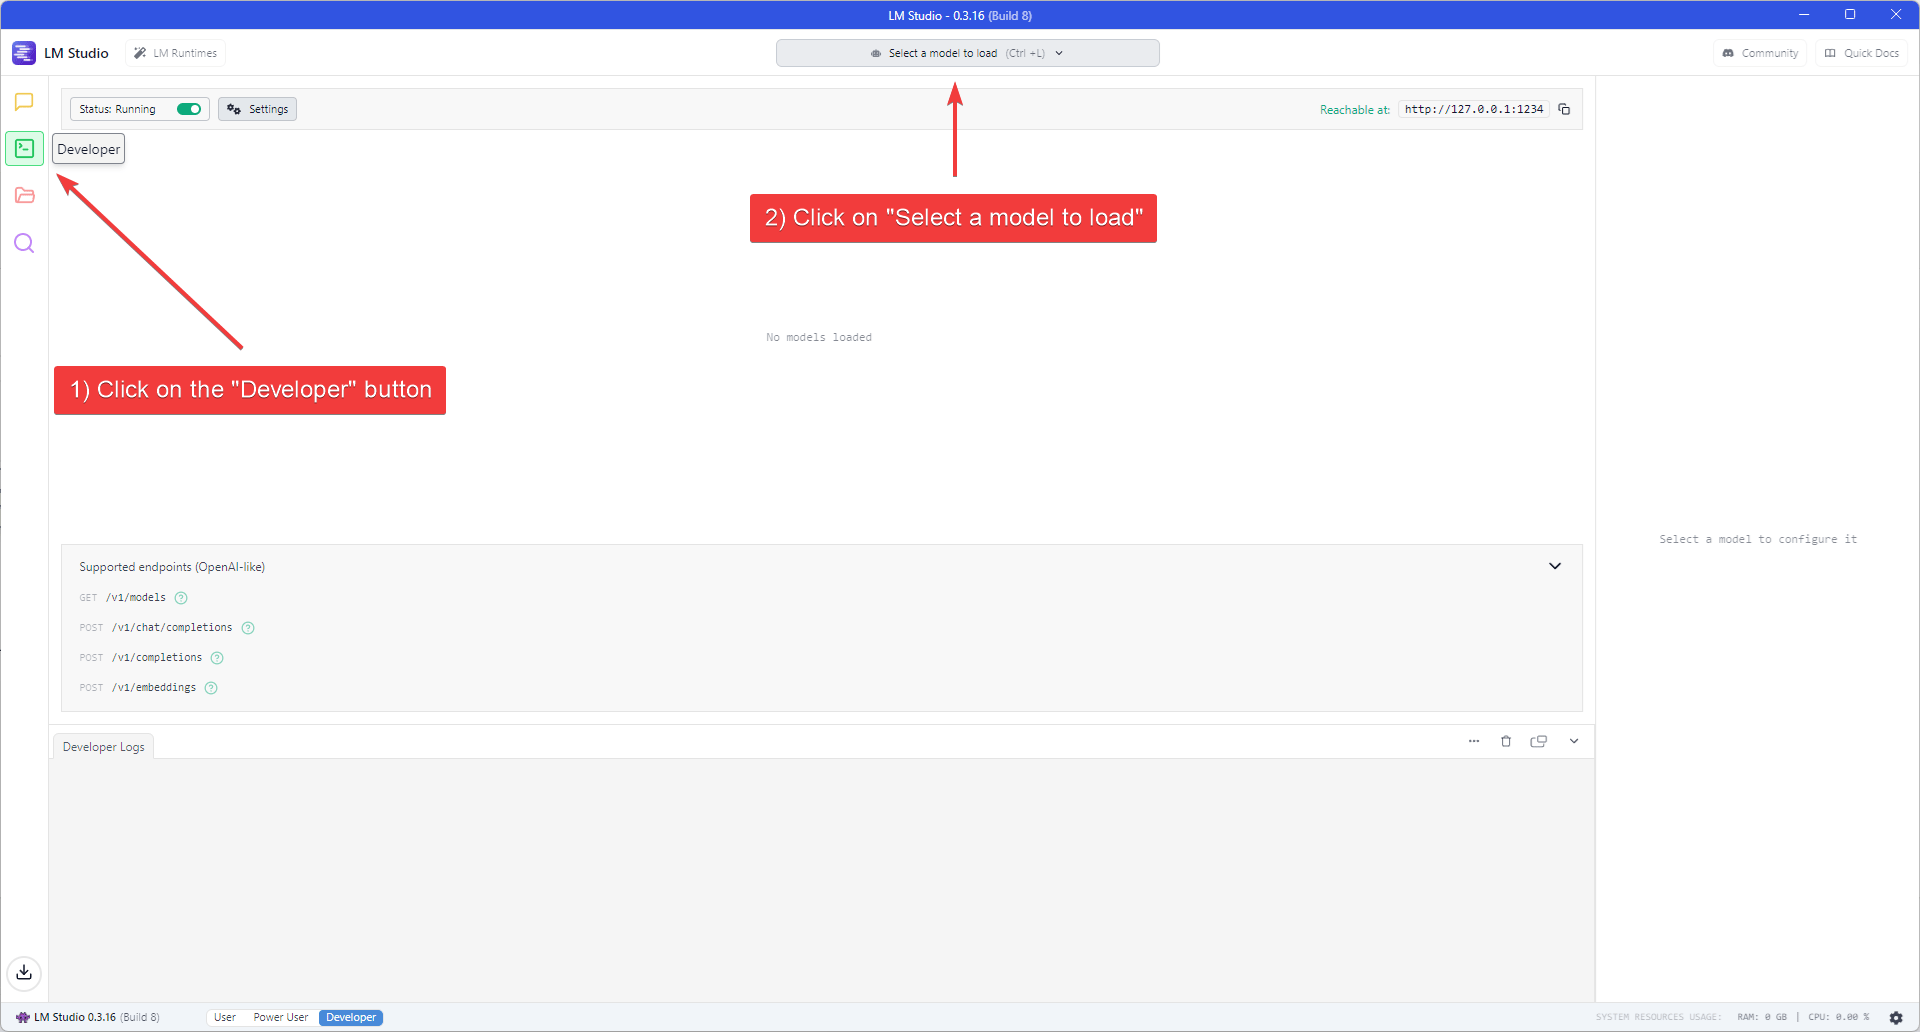
- Click the “Developer” button (Console icon) on the left navigation bar to open the Developer Console.
- Click the “Select a model to load” dropdown at the top of the application window.
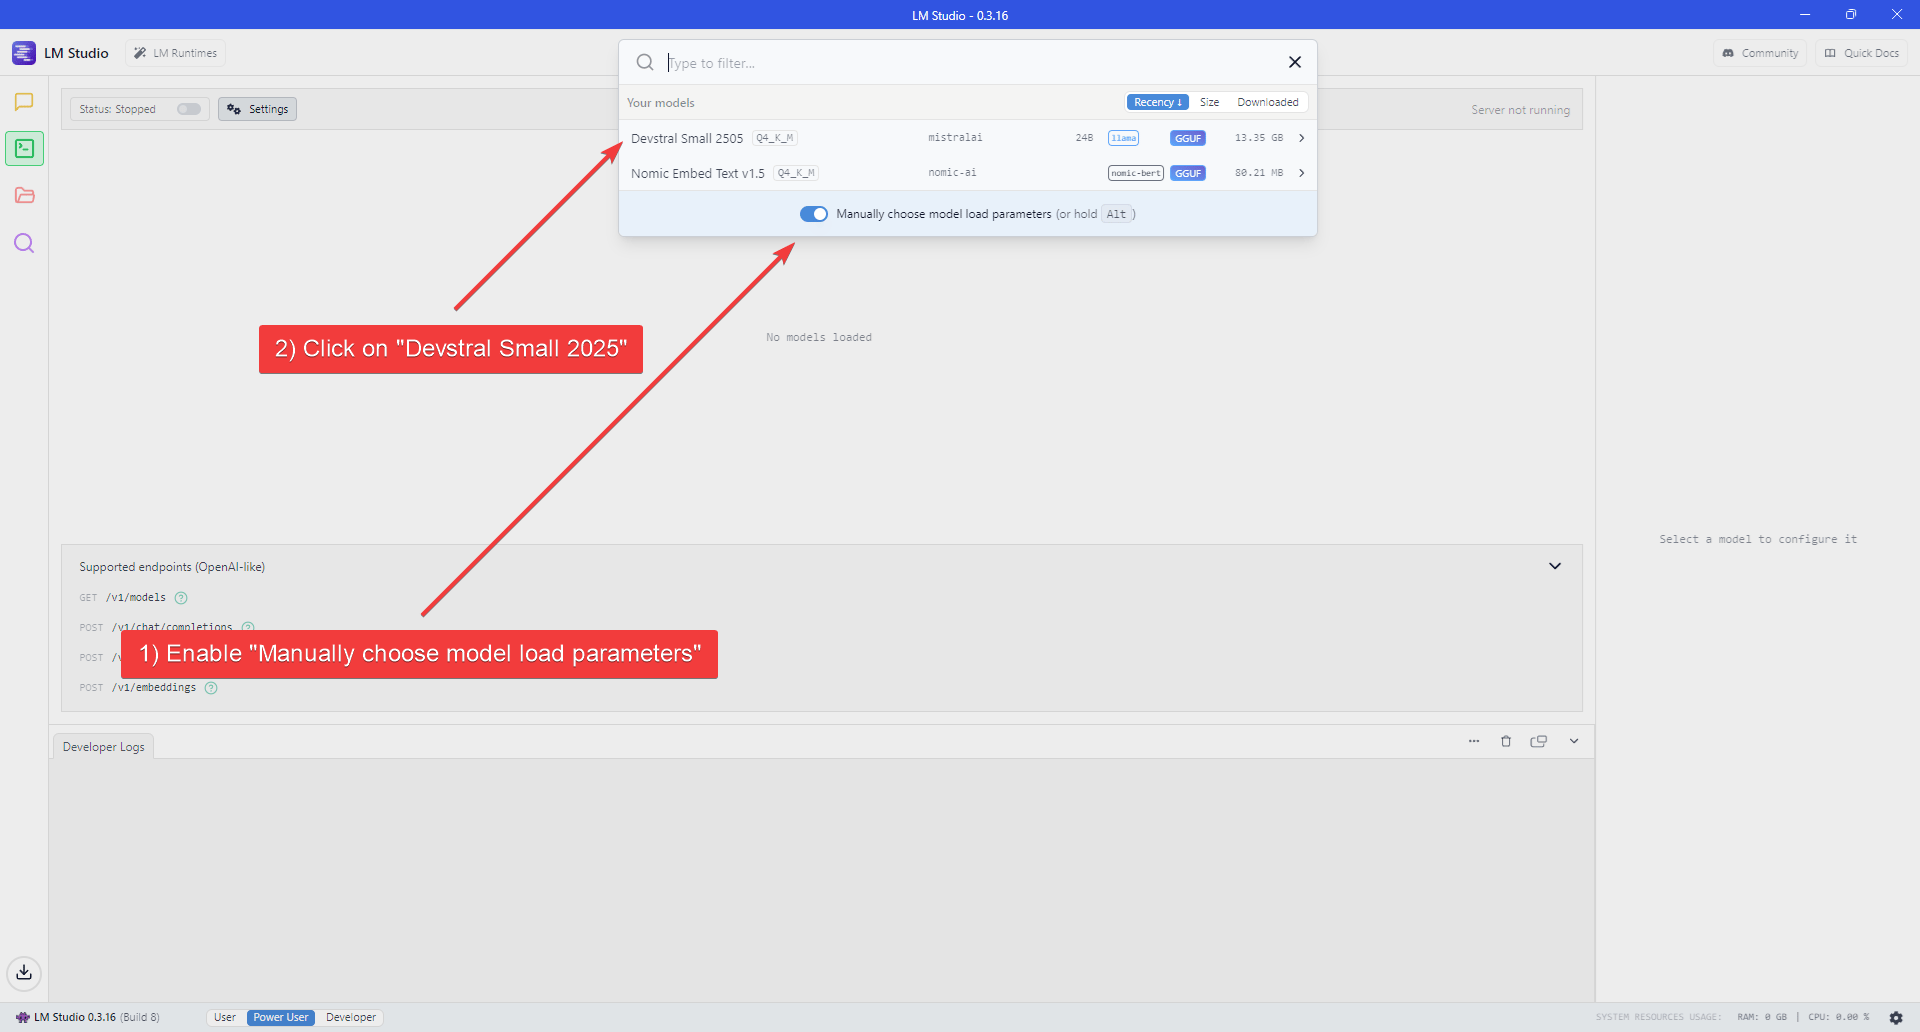
- Enable the “Manually choose model load parameters” switch.
- Select Qwen3.6-35B-A3B from the model list.
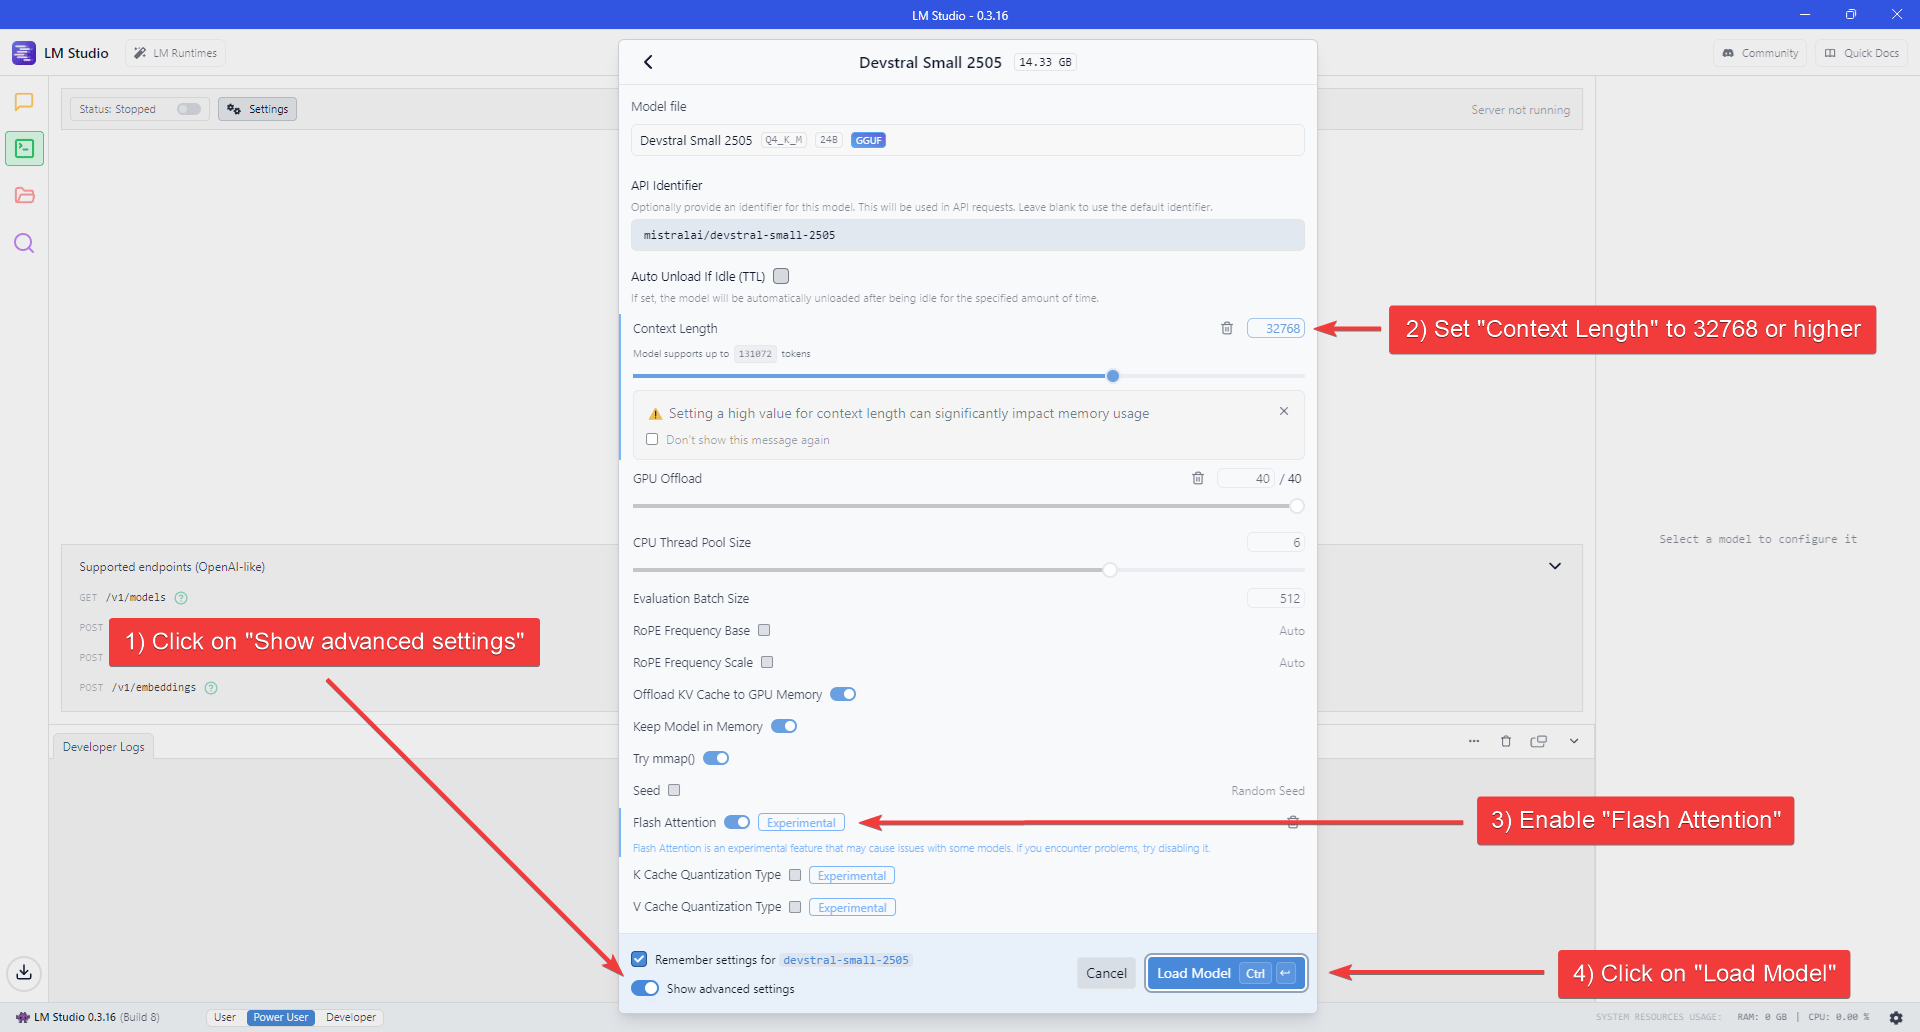
- Enable the “Show advanced settings” switch at the bottom of the Model settings flyout to show all the available settings.
- Set “Context Length” to at least 22000 (for lower VRAM systems) or 32768 (recommended for better performance) and enable Flash Attention.
- Click “Load Model” to start loading the model.
4. Start the LLM server
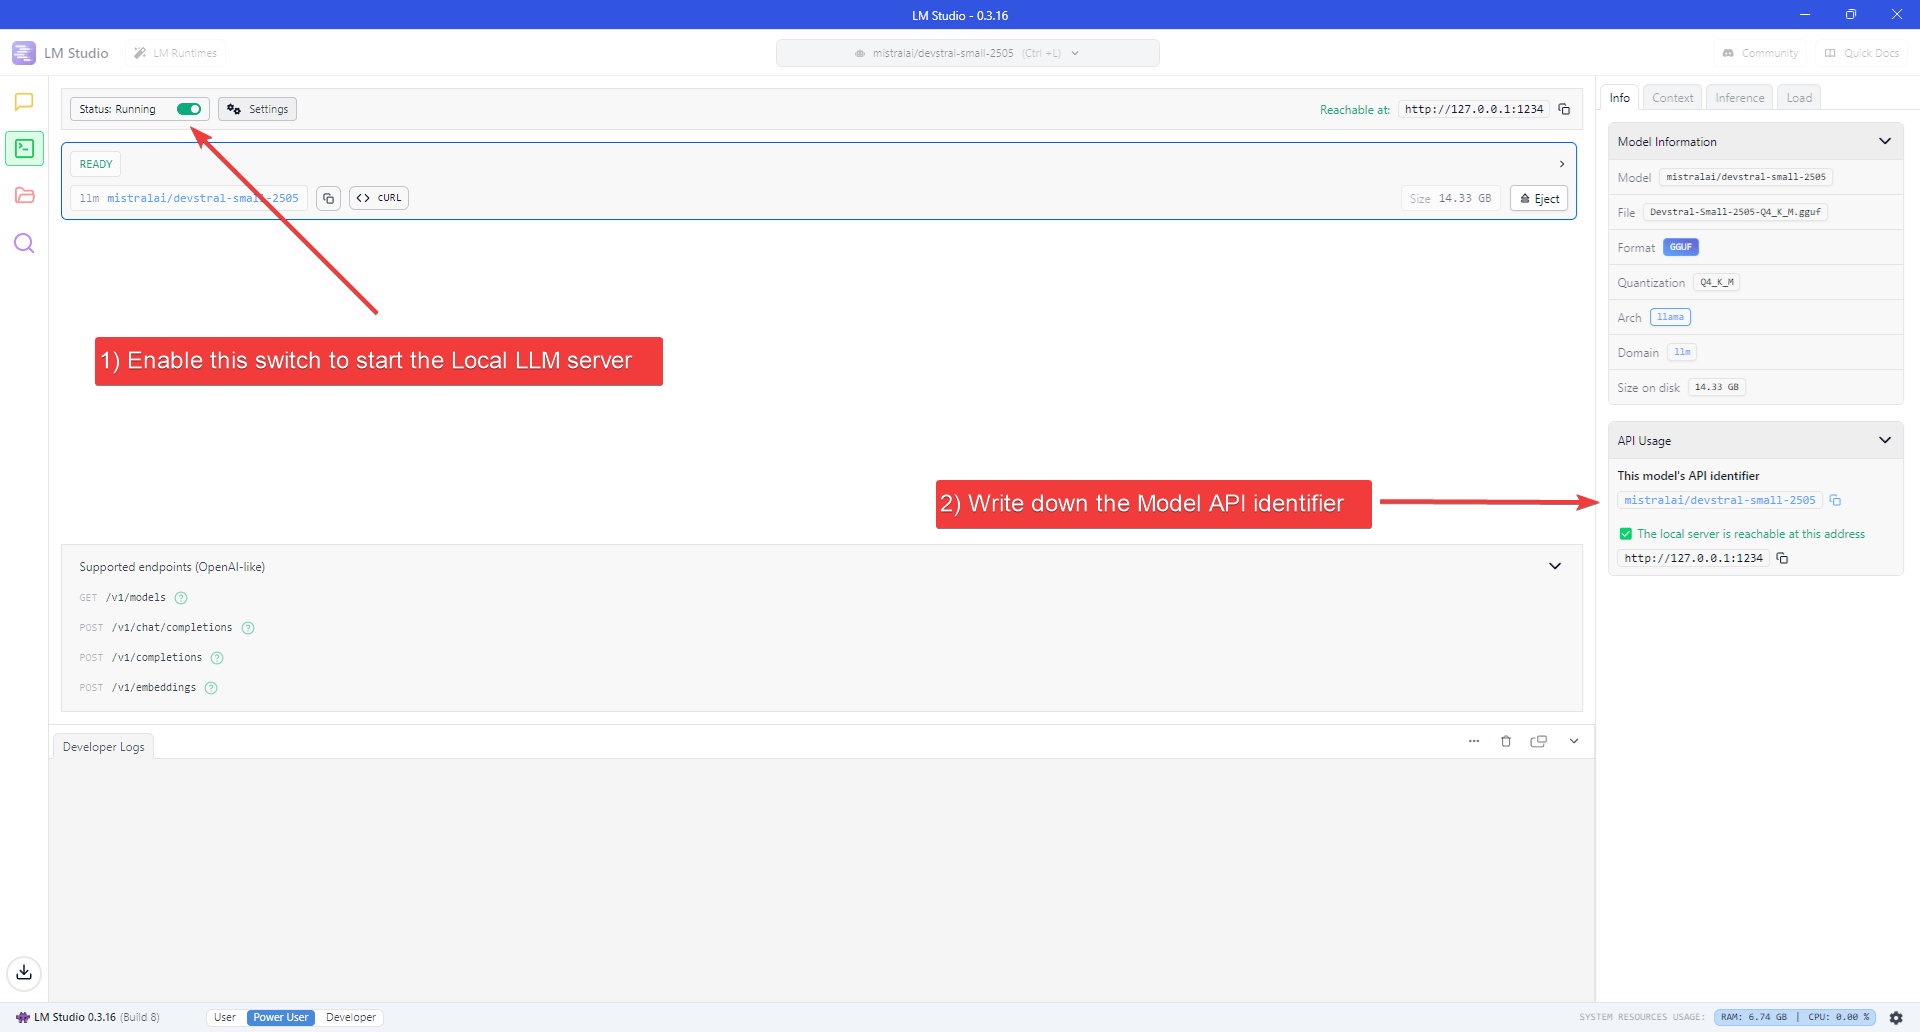
- Enable the switch next to “Status” at the top-left of the Window.
- Take note of the Model API Identifier shown on the sidebar on the right.
5. Start OpenHands
- Check the installation guide and ensure all prerequisites are met before running OpenHands, then run:
- Wait until the server is running (see log below):
- Visit
http://localhost:3000in your browser.
6. Configure OpenHands to use the LLM server
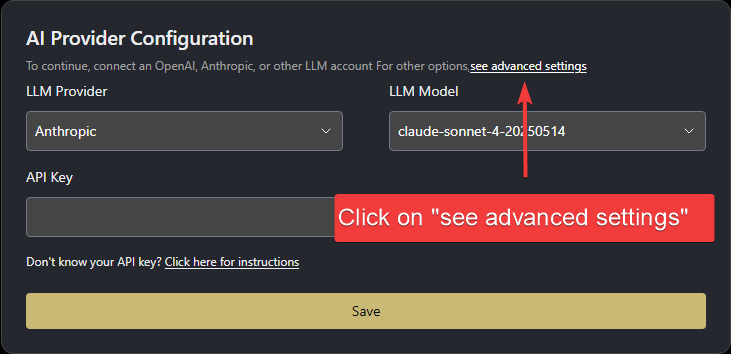
Once you open OpenHands in your browser, you’ll need to configure it to use the local LLM server you just started. When started for the first time, OpenHands will prompt you to set up the LLM provider.- Click “see advanced settings” to open the LLM Settings page.
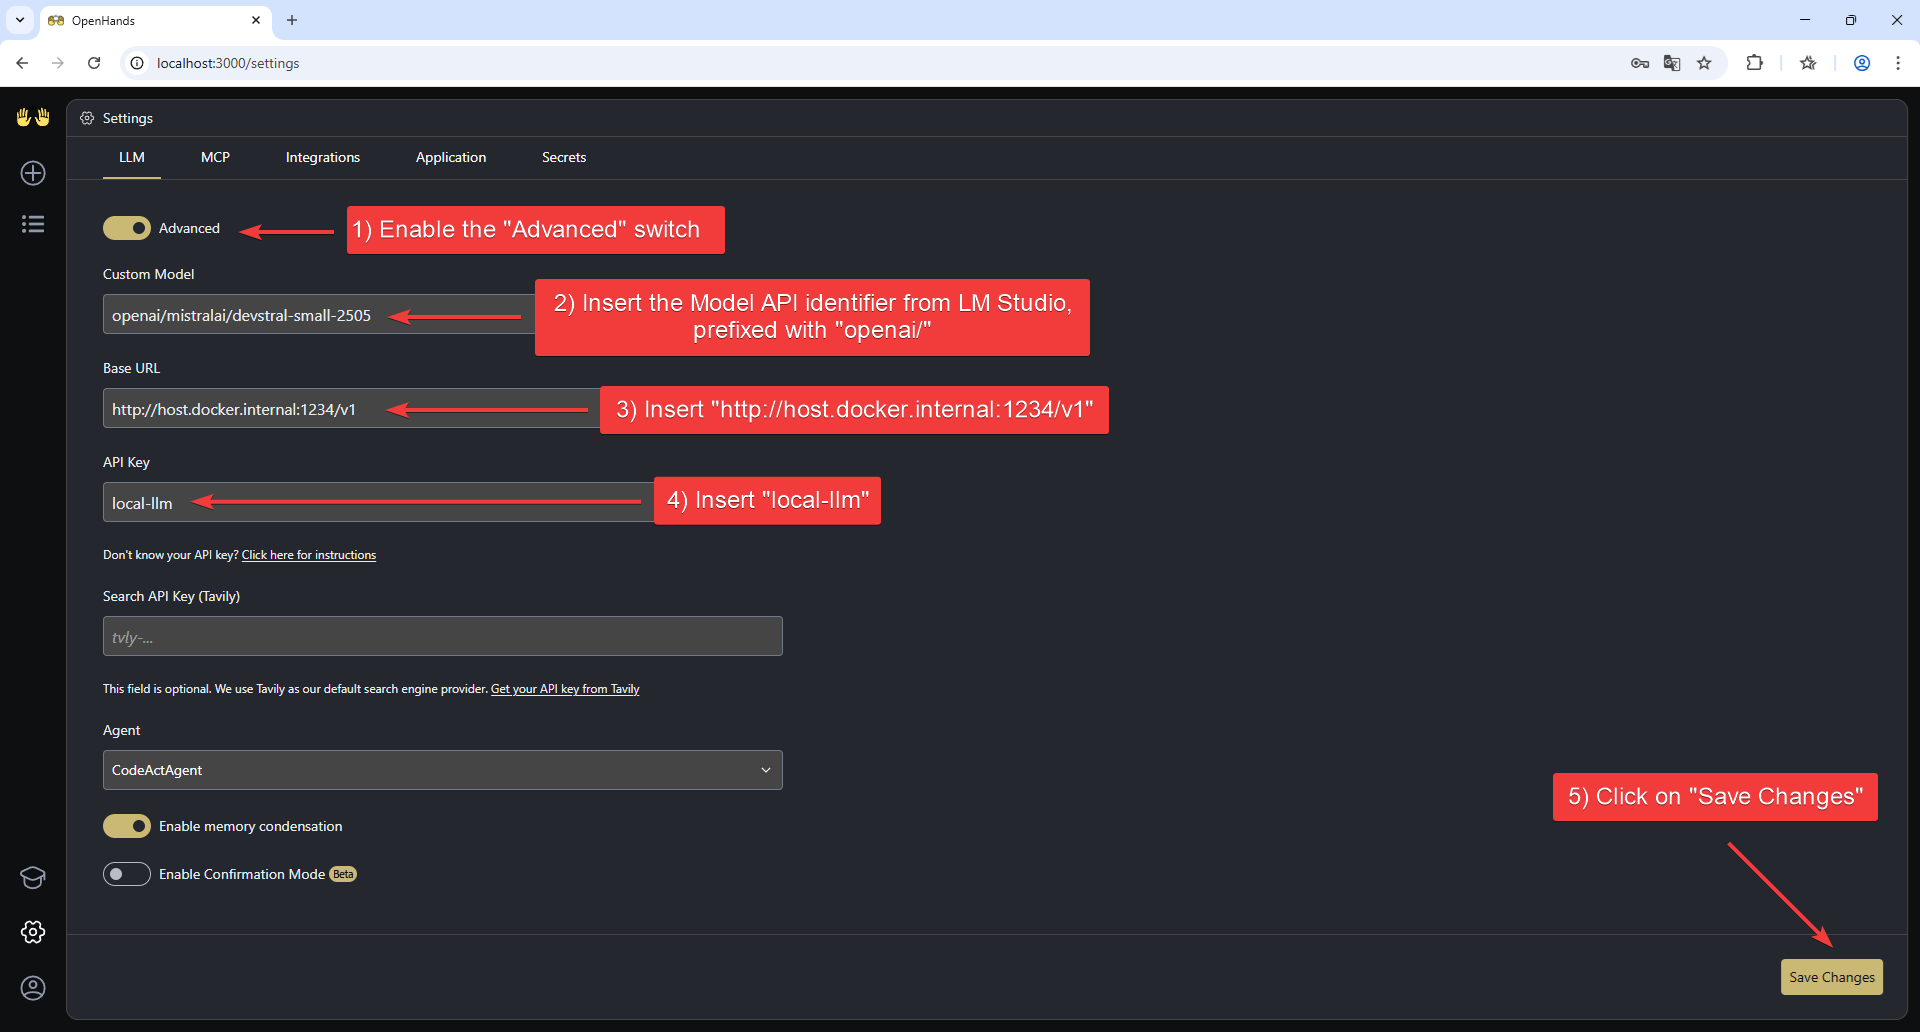
- Enable the “Advanced” switch at the top of the page to show all the available settings.
-
Set the following values:
- Custom Model:
openai/qwen/qwen3.6-35b-a3b(the Model API identifier from LM Studio, prefixed with “openai/”) - Base URL:
http://host.docker.internal:1234/v1 - API Key:
local-llm
- Custom Model:
- Click “Save Settings” to save the configuration.
Community-Reported Notes and Troubleshooting
If OpenHands behaves like a plain chatbot, refuses to use tools or files, or has constant failed tool calls with a local model, the issue may be with the model itself rather than your setup. Even with a large context window, some local models may struggle with reliable tool use. Community-reported working models:qwen2.5-coder-14b-instruct— reported to resolve chatbot-like behaviorqwopus3.5-27b-v3 Q8_0(and similar retrained qwopus variants) — reported to work well with tool calls
Advanced: Alternative LLM Backends
This section describes how to run local LLMs with OpenHands using alternative backends like Ollama, Atomic Chat, SGLang, or vLLM — without relying on LM Studio.Create an OpenAI-Compatible Endpoint with Ollama
- Install Ollama following the official documentation.
- Example launch command for Qwen3.6-35B-A3B:
Create an OpenAI-Compatible Endpoint with Atomic Chat
Atomic Chat is an open-source desktop app for running local models (and optional cloud providers). It exposes a single OpenAI-compatible HTTP API on your machine, typically athttp://127.0.0.1:1337/v1. See the upstream README for downloads, system requirements, and release notes.
1. Install and start Atomic Chat
- Download Atomic Chat from atomic.chat or GitHub Releases.
- Open Atomic Chat and enable the local API server in the app settings (defaults may vary by version; the API is usually served on port 1337).
- Download and load a coding-capable model with a large context window. OpenHands needs enough context for the system prompt and tools — use at least ~22k tokens, and 32k+ when your hardware allows (same guidance as LM Studio on this page).
Atomic Chat binds the local API to loopback (
127.0.0.1) by default, so the OpenAI-compatible endpoint is not exposed on your LAN unless you explicitly change the server host and set an API key. For Docker on the host, use host.docker.internal:1337/v1 as described below.2. Discover the model id OpenHands must use
Atomic Chat lists served models via the OpenAI-compatibleGET /v1/models endpoint. From the same machine:
id field of the model you have loaded as the suffix after openai/ in OpenHands (see Configure OpenHands (Alternative Backends) below).
3. Point OpenHands at Atomic Chat
Follow Run OpenHands (Alternative Backends) and Configure OpenHands (Alternative Backends) below. When OpenHands runs inside Docker and Atomic Chat runs on the host, use:- Base URL:
http://host.docker.internal:1337/v1 - Custom Model:
openai/<model-id-from-/v1/models>(prefix required, same convention as LM Studio on this page) - API Key: any placeholder string (for example
local-llm) unless your Atomic Chat build requires a real key
http://127.0.0.1:1337/v1 instead.
Atomic Chat also ships a Launch → OpenHands integration that can configure LLM_BASE_URL, LLM_MODEL, and LLM_API_KEY for the OpenHands CLI automatically.
Troubleshooting
- Connection refused from Docker: confirm Atomic Chat is running, the local server is enabled, and your
docker runincludes--add-host host.docker.internal:host-gatewayas in local setup. - Wrong model errors: the Custom Model string must match an
idreturned byGET /v1/modelsafter theopenai/prefix. - Agent ignores tools or acts like a chatbot: try a stronger coding model or a larger context window; see Community-Reported Notes and Troubleshooting on this page.
Create an OpenAI-Compatible Endpoint with vLLM or SGLang
First, download the model checkpoint:Serving the model using SGLang
- Install SGLang following the official documentation.
- Example launch command (with at least 2 GPUs):
Serving the model using vLLM
- Install vLLM following the official documentation.
- Example launch command (with at least 2 GPUs):
- Install the Arctic Inference library that automatically patches vLLM:
- Run the launch command with speculative decoding enabled:
Run OpenHands (Alternative Backends)
Using Docker
Run OpenHands using the official docker run command.Using Development Mode
Use the instructions in Development.md to build OpenHands. Start OpenHands usingmake run.
Configure OpenHands (Alternative Backends)
Once OpenHands is running, open the Settings page in the UI and go to theLLM tab.
- Click “see advanced settings” to access the full configuration panel.
- Enable the Advanced toggle at the top of the page.
- Set the following parameters, if you followed the examples above:
- Custom Model:
openai/<served-model-name>- For Ollama:
openai/qwen3.6:35b-a3b - For SGLang/vLLM:
openai/Qwen3.6-35B-A3B - For Atomic Chat:
openai/<model-id-from-/v1/models>(see Atomic Chat above)
- For Ollama:
- Base URL:
http://host.docker.internal:<port>/v1Use port11434for Ollama,1337for Atomic Chat (default), or8000for SGLang and vLLM. - API Key:
- For Ollama or Atomic Chat: any placeholder value (e.g.
dummy,local-llm) unless your server requires a real key - For SGLang or vLLM: use the same key provided when starting the server (e.g.
mykey)
- For Ollama or Atomic Chat: any placeholder value (e.g.
- Custom Model: